August 25, 2010
Behind the Scenes {Photographer Share} | Hampton Roads Child & Family Photographer
This post is going to be a bit like “Magic’s Biggest Secrets Finally Revealed!” It requires more typing and less images than usual, but I think you’ll find it interesting and maybe even surprising!
I recently read (and shared on my Facebook Fan Page) a great blog post written by a very talented photographer about the phrase, “Your camera takes nice pictures!“. The response – thanks to What the Duck cartoons is, “Your mouth makes nice compliments.” 😀 Most people know that it takes more than just a nice camera to be a professional photographer, but I still encounter those who believe that when they pay a couple hundred (or thousand!) dollars for a custom photography session that they are paying for the hour or two that the photographer is physically with them, taking pictures. In reality, there are many more hours that go into each session and today I’d like to share with you one part of the process:
Post Processing
Post processing refers to the actions a photographer takes AFTER the photos are downloaded onto the computer. I use Lightroom 3 and Photoshop CS5 to process my photos. Because I shoot in RAW, my photos come straight-off-of-the-camera (SOOC) looking somewhat dull and lifeless. That’s because when you take a photo in .jpg form, the camera automatically adds a layer of “help” to your photo. I decided that I wanted to be in total control of my images (imagine that, ME? having CONTROL issues??) so RAW is the way to go. The first thing I do after the photos pop up in Lightroom is adjust the white balance and any exposure/brightness/contrast needed. I also crop using the Rule of Thirds (most of the time) and check for noise/sharpness issues. That’s the first step. I haven’t even started actually processing yet!
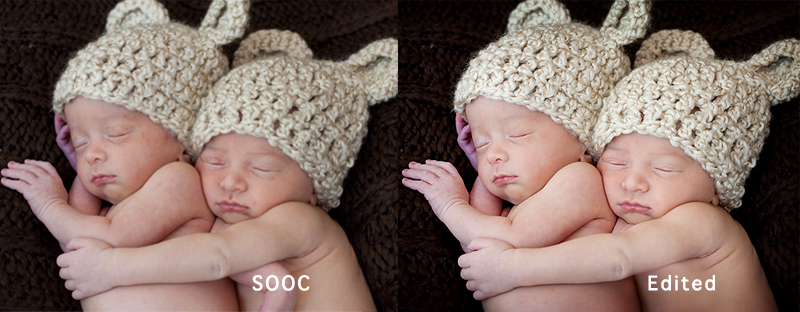
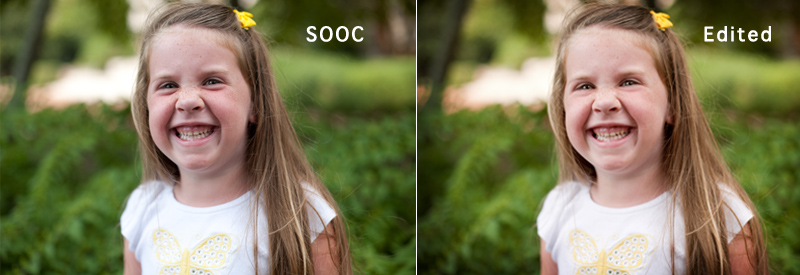
I then pull them into Photoshop and start making magic happen helping my photos really shine! I brighten, sharpen, dodge, burn, clone, and mask in order to make the adjustments needed to turn an ordinary picture into wall art. Here are a few examples – I am putting the SOOC (straight off of the camera – eek!) image first and the final, edited image next so that you can see what a good image looks like right off my camera and how post processing (plus a bit of creative vision sometimes) makes the image truly wall worthy!
Because my home studio is small, I have to do a bit of creative cropping (and sometimes extending the backdrop) for my cake smash sessions. Here’s an example from my own son’s 1st Birthday Cake Smash:
With newborns, quite a bit of extra time goes into post processing. Newborns often have blotchy skin, baby acne, and blemishes from their “travels” into the world. While I am careful to preserve the natural look of their skin, I am sure to show parents an image that they will treasure of their perfect newborn child.
In this next example, you can see how I have lessened the little pouches of skin underneath this little sweetheart’s eyes. She was smiling so big that the crinkles were a bit distracting to me. I also reserve this trick for my new, sleep deprived mommies. It’s like a virtual day at the spa!
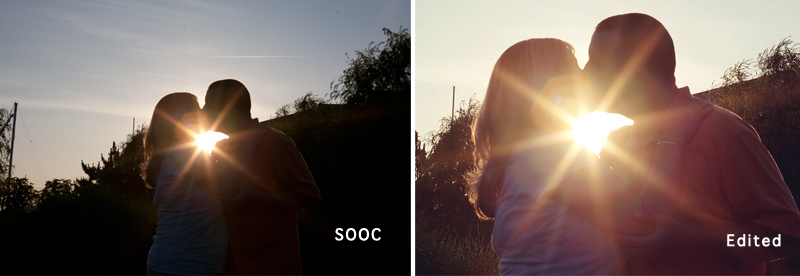
Sometimes I have an idea in my head, but I’m not exactly sure how it’s going to turn out in the editing process. For example, I knew I wanted to capture the sun’s rays with this couple, but wasn’t sure how close I would want it cropped in. So, I gave myself a wide space to work with in the original shot.
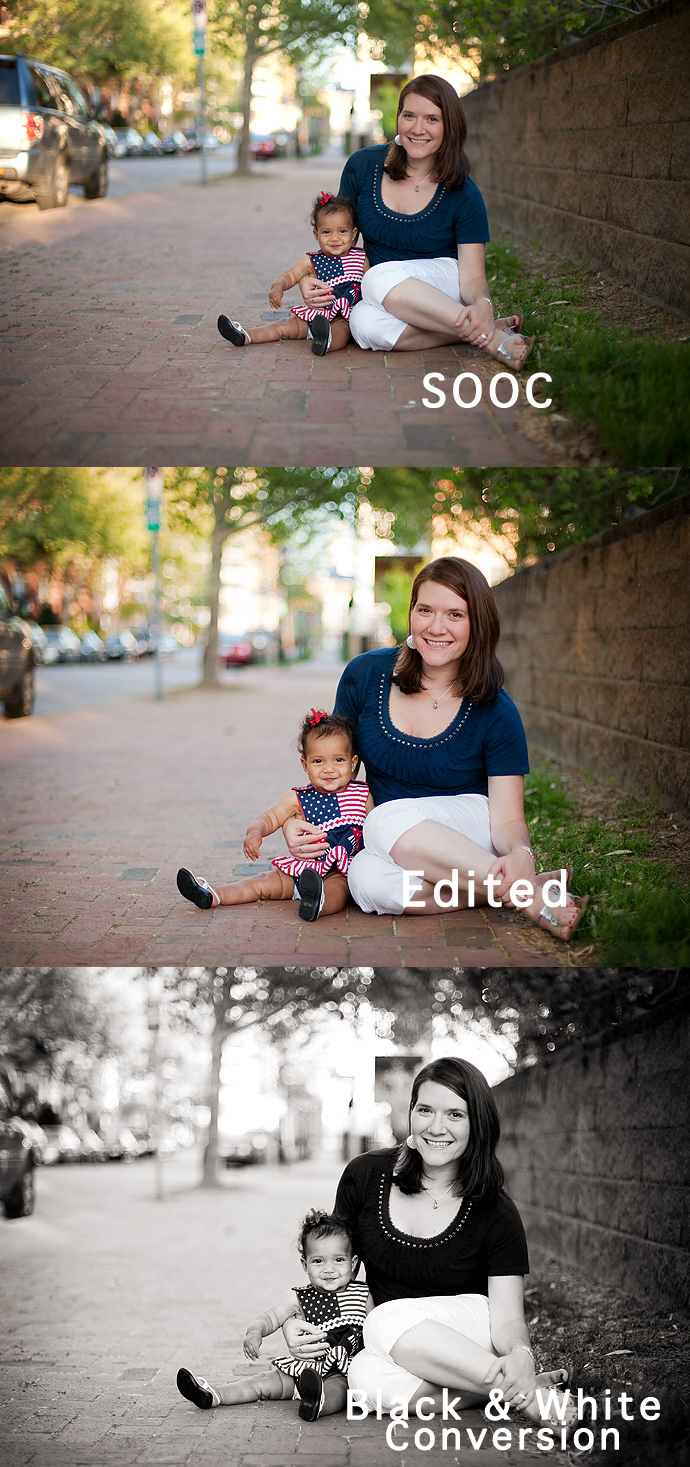
I often convert photos to black and white for an extra “pop” – or if the emotion, light, or setting speaks to me. But black & white is not as easy as simply taking the color out. There are many ways to convert to black and white and it’s important to know the right way – so that people don’t end up looking like they have gray skin! In this final example, you can see how I took a photo of this mommy and daughter on the sidewalk in downtown Norfolk and turned both the color and the black & white versions into portraits they could hang on any wall in their home!
So, there you have it. A little “Behind the Scenes” peek at a custom photographer’s work. Hopefully it will help some of you while you’re waiting on your gallery to understand why it takes 10-14 days to see your proofs – or maybe will help those of you considering the cost vs. benefit of booking a session with Kimberlin Gray Photography or any other custom photographer. We take pride in our work and our goal is to give you timeless images that you will treasure for years to come!
What can we create for you?
From timeless keepsakes to themed photo fun, we’ve got everything covered: props, angles, lighting, and all the coffee required to make it look effortless. All you need to do is show up, relax, and let us create the kind of images you’ll swoon over for decades.
Newborn
Cake Smash
Kids Themes
Life’s messy. Your portraits shouldn’t be.
Families
Let us handle the photos.
Because let’s face it -
you’ve got enough on your plate.
Don’t worry, I got this. You show up, I’ll do the rest. Capturing the tiny toes, squishy cheeks, and absolute chaos of your new baby? That’s my superpower.
Click the button. Slide into my inbox. Let’s make some damn magic. Your future self (and your Insta followers) will thank you.
Contact Us
All images copyright Kimberlin Gray Photography | Site Credits | privacy policy
